Artisan Développeur

Qualité, amélioration continue, agilité.

How to : elastic search + fosElastica + symfony2 + typehead + bloodhound + elastic suggesters

(POST in BETA version, but I prefer release it, and enhance it later, than never publish ^^)

I want to use Elastic, to manage my search functionality.

It’s a symfony2 project, so I start my research by the integration of Elastic in symfony2, and FosElastica came up.
Thanks to FOS #friendOfSymfony2 people again, and again, your work is amazing !
Also nothing happends here without Elastica

This bundle provides integration with ElasticSearch and Elastica with Symfony2. Features include:

Integrates the Elastica library into a Symfony2 environment
Automatically generate mappings using a serializer
Listeners for Doctrine events for automatic indexing

I assume here, you have already a running symfony2 project, with data on it, I use this setup, to search over user, by name, mail, and over another data named « tags », a kind of internal references to group items.

Steps :

  1. install Elastic
  2. configure Elastic
  3. install FosElastica
  4. configure FosElastica
  5. try with Elastic web interface to confirm 4 firsts sets
  6. add typeahead.js to your page
  7. configure and implement bloodhound and typeahead
  8. Enjoy !


1 – Install of elasticsearch :

[pastacode lang= »bash » message= » » highlight= » » provider= »manual »]

apt-get install elasticsearch

[/pastacode]

(If you are under ubuntu use sudo if you not root, tested on ubuntu 15.10 and Debian 8.)

To have elastic working, I’ve to :

[pastacode lang= »bash » message= » » highlight= » » provider= »manual »]

chmod -R elasticsearch:elasticsearch /var/lib/elasticsearch

[/pastacode]

Both debian and ubuntu.

After that, you need to go to :

[pastacode lang= »bash » message= » » highlight= » » provider= »manual »]

cd /etc/elasticsearch/

[/pastacode]

and open « elasticsearch.yml » to configure it.

2 – Configuration

(TODO : CORS config + security)

https://www.elastic.co/blog/found-elasticsearch-security

https://xenforo.com/community/threads/how-to-basic-elasticsearch-installation-debian-ubuntu.26163/

3 – Install FosElastica

with composer :

[pastacode lang= »bash » message= » » highlight= » » provider= »manual »]

php composer.phar require friendsofsymfony/elastica-bundle "~3.0"

[/pastacode]

And enable it :

[pastacode lang= »php » message= » » highlight= » » provider= »manual »]

[/pastacode]

4 - FosElastica configuration :

http://elasticsearch-users.115913.n3.nabble.com/Http-Cors-Setting-td4066032.html

https://www.elastic.co/guide/en/elasticsearch/reference/current/modules-http.html#_settings_3


http://twitter.github.io/typeahead.js/examples/
https://www.elastic.co/guide/en/elasticsearch/reference/current/search-suggesters-completion.html
https://github.com/FriendsOfSymfony/FOSElasticaBundle/issues/380
https://github.com/FriendsOfSymfony/FOSElasticaBundle/issues/445
https://github.com/FriendsOfSymfony/FOSElasticaBundle/issues/469
https://github.com/FriendsOfSymfony/FOSElasticaBundle/issues/673
https://github.com/FriendsOfSymfony/FOSElasticaBundle
http://stackoverflow.com/questions/21530063/how-do-we-set-remote-in-typeahead-js-0-10/21533204#21533204

Faster Autocomplete with typeahead.js, Elasticsearch & nginx


http://mycodde.blogspot.se/2014/12/typeaheadjs-autocomplete-suggestion.html
https://www.elastic.co/guide/en/elasticsearch/reference/master/search-suggesters.html
https://www.elastic.co/guide/en/elasticsearch/reference/current/search-suggesters-completion.html
[php] How to manage uploaded images in secure way

I dev lately on an open source project, GRR (https://github.com/JeromeDevome/GRR/), it’s an old resources management script.

Writen a looooong time ago, « old school » code, but functional and pretty complete.

A security researcher , « kmkz » (Bourbon Jean-marie) – twitter: @kmkz_security, has discovered a security flaw which permit to upload a shell using the upload logo functionality.
Just need to rename the image like EvilShell.php.jpg …
The old code, never check if the submitted file have more than one extension, or if it’s an actual image… Just check if the final extension is jpg, gif or png.

After lot of reading about mime type, EXIF code injection, magic bytes, and million of stackoverflow questions, my little function :

https://github.com/nicolas-san/upload

This is a small, not POO, simple function to check :

  • multiple extension (logo.php.png)
  • extension allowed (jpg, png or gif)
  • good mime type with php finfo_file method http://php.net/manual/en/intro.fileinfo.php
  • if image is valid and remove EXIF with one of the imagecreateFORMAT function from GD http://php.net/manual/en/function.imagecreatefrompng.php
  • if target directory is writable
  • if move_uploaded_file pass without error

The idea is to start test with the obvious attempts, remove the EXIF data to be sure and rename the file to avoid long and wired names.

I think I cover all attack vectors with an image, but if you want test it, break it, improve or comment, do it !

[pastacode lang= »php » user= »nicolas-san » repos= »upload » path_id= »upload.php » revision= »master » highlight= » » lines= » » provider= »github »/]


KVM – resize volume disk virt-manager – virt-resize

If you have install a new window 7 virtual machine to do some tests, very very quickly, you can have the same problem is had.

8 GB volume disk is not enough…

First boot of the vm, windows complains about space left, if you want to do updates, it’s too late 🙂

I used to be more virtualbox for my little needs, most for web test under several browser under native os. But, I’m not the oracle biggest fan, so go to kvm.

I use virt-manager to setup vms, and it’s very simple.

Now I want to resize my little volume, and have more space for my win7 test vm.

  1. install libguestfs-tools
  2. create a new volume
  3. resize
  4. add new volume
  5. Profits !

1 – libguestfs-tools

In a terminal (konsole under kde) try virt-resize, if you don’t have it do :

[pastacode lang= »bash » message= » » highlight= » » provider= »manual »]

apt-get install libguestfs-tools

[/pastacode]

2 – create new volume

First see what are your pools :

[pastacode lang= »bash » message= » » highlight= » » provider= »manual »]

virsh pool-list

[/pastacode]

Result :

[pastacode lang= »bash » message= » » highlight= » » provider= »manual »]

 Nom                  État      Démarrage automatique
-------------------------------------------
 2to                  actif      yes   
  
 isos                 actif      yes       

[/pastacode]

I want use the pool named « 2to ».

Create the new volume on the « 2to » pool with virsh:

[pastacode lang= »bash » message= » » highlight= » » provider= »manual »]

virsh vol-create-as --format qcow2 2to win7homepremium.qcow2 15G

[/pastacode]

I choose to keep the qcow2 format, because the input volume is in qcow2.

3 – Resize

Take a look at the partitions in the current volume :

Search for the volume :

[pastacode lang= »bash » message= » » highlight= » » provider= »manual »]

virsh dumpxml win7 | grep source

[/pastacode]

« win7″ is my guestname.

Output is :

[pastacode lang= »markup » message= » » highlight= » » provider= »manual »]


[/pastacode]

See the partitions :

[pastacode lang= »bash » message= » » highlight= » » provider= »manual »]

virt-filesystems --long --parts --blkdevs -h -a /media/raid/vms/window7.qcow2

Name       Type       MBR  Size  Parent
/dev/sda1  partition  07   100M  /dev/sda
/dev/sda2  partition  07   7,9G  /dev/sda
/dev/sda   device     -    8,0G  -

[/pastacode]

We need to resize the volume, but virt-resize copy input to output, and create a new partition with the extra space, we need to use –expand option on /dev/sda2 :

[pastacode lang= »bash » message= » » highlight= » » provider= »manual »]

virt-resize --expand /dev/sda2 /media/raid/vms/window7.qcow2 /media/raid/vms/win7homepremium.qcow2
[   0,0] Examining /media/raid/vms/window7.qcow2
**********

Summary of changes:

/dev/sda1: This partition will be left alone.

/dev/sda2: This partition will be resized from 7,9G to 14,9G.  The 
filesystem ntfs on /dev/sda2 will be expanded using the 'ntfsresize' 
method.

**********
[   4,0] Setting up initial partition table on /media/raid/vms/win7homepremium.qcow2
[   4,0] Copying /dev/sda1
[   4,0] Copying /dev/sda2
 100% ⟦▒▒▒▒▒▒▒▒▒▒▒▒▒▒▒▒▒▒▒▒▒▒▒▒▒▒▒▒▒▒▒▒▒▒▒▒▒▒▒▒▒▒▒▒▒▒▒▒▒▒▒▒▒▒▒▒▒▒▒▒▒▒▒▒▒▒▒▒▒▒▒▒▒▒▒▒▒▒▒▒▒▒▒▒▒▒▒▒▒▒▒▒▒▒▒▒▒▒▒▒▒▒▒▒▒▒▒▒▒▒▒▒▒▒▒▒▒▒▒▒▒▒▒▒▒▒▒▒▒▒▒▒▒▒▒▒▒▒▒▒▒▒▒▒▒▒▒▒▒▒▒▒▒▒▒▒▒▒▒▒▒▒▒▒▒▒▒▒▒▒▒▒▒▒▒▒▒▒▒▒▒▒▒▒▒▒▒▒▒▒▒▒▒▒▒▒▒▒▒▒▒▒▒▒▒▒▒▒▒▒▒▒▒▒▒▒▒▒▒▒▒▒▒▒▒▒▒▒▒▒▒▒▒▒▒▒▒▒▒▒▒▒▒▒▒▒▒▒▒▒▒▒▒▒▒▒⟧ 00:00
[  28,0] Expanding /dev/sda2 using the 'ntfsresize' method

Resize operation completed with no errors.  Before deleting the old disk, 
carefully check that the resized disk boots and works correctly.

[/pastacode]

At this point you have a new 15GB volume, check the partitions :

[pastacode lang= »bash » message= » » highlight= » » provider= »manual »]

virt-filesystems --long --parts --blkdevs -h -a /media/raid/vms/win7homepremium.qcow2
Name       Type       MBR  Size  Parent
/dev/sda1  partition  07   100M  /dev/sda
/dev/sda2  partition  07   15G   /dev/sda
/dev/sda   device     -    15G   -

[/pastacode]

All good !

4 – Add the new volume with virt-manager

I know, I know, I can do the same with a better « sysadmin way » with my terminal, but hey, I’m not a terminal freak ^^

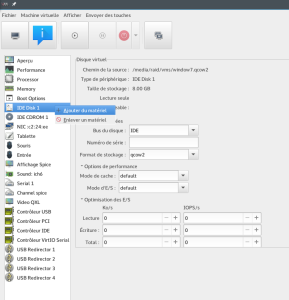
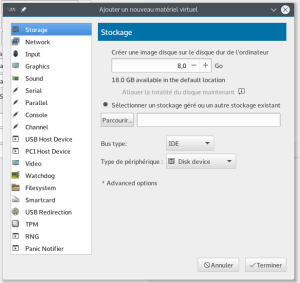
  • Go to the vm details and create a new device with the right mouse clic:

kvm - virt-manager to create a new device

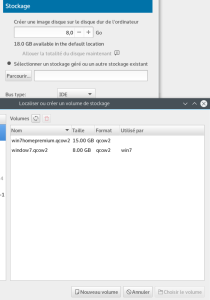
  • Select the second option : existing storage and « browse » (parcourir in french)

kvm - new disk to resize the old one

  • Search/select your new create qcow2 volume, and confirm:

KVM - virt manager - create a new disk

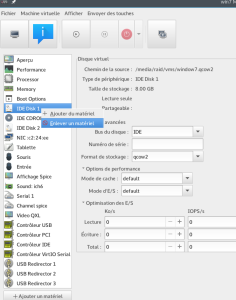
  • last step you have to remove/delete old « Disk1 » because windows have some signature device conflit if you try to boot with both disks:

Delete virtual disk kvm

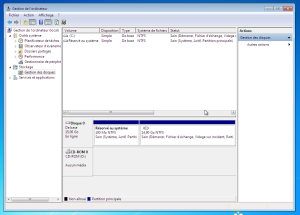
After that you can boot your vm and check disks :

I’ve to reboot windows7 the first boot after the resize, the finish install new device.

6-newDisk

All good, new size ! I can do updates, and use my testing vm.

virt-resize complete doc